We introduce a top-down generative workflow that can be used to create full-feature films and movies starting from a single text prompt.
Independent movie making sounds like fun, but when you get down to it, it is not the easiest or the most fun thing to do. Mostly because it involves a steep learning curve with tooling and then an even steeper learning curve with automation or a perpetual grind.. Generative AI makes it easier, but even then, it is not easy to stitch together scenes in a coherent manner to effectively tell stories while hopping over tools and editors.
VidGPT One (Alpha) is a top-down approach to generative movie-making where you start with an idea—describe it in detail in the editor, and the AI creates a full-feature film based on your description.
You now have a pretty good film that is editable at the scene, video, image, audio, and text levels.
You can then drill down to edit individual scenes and add or remove scenes to exactly suit your needs in the Studio editor. Simply hit render at any time to create your video.
How does it work?
The user starts with a prompt such as "Give me a 5-line humorous story about a space monkey on Mars." The app then processes the user prompt through a series of agentic pipelines to reach the final result, persisting the state at each step to make it easy to go back or redo any stage. Once you have the first render, you can download and publish if you're satisfied, edit it in Studio to change a few scenes, or hit render again with an updated description for a completely new render.
Here is a brief description of each stage in the pipeline:
Transcript and Theme Generation Stage-
- Movie Transcript Construction: Once the user provides a movie generation request, the system constructs a movie transcript from the request.
- Movie Script Creation: The system then creates a movie script JSON object from the transcript. The movie script contains a list of "Scenes" and "Sounds."
- Scene Classification:
- Scenes can be of type "Character," "Narration," "Sound Effect," or none. Depending on the type, they are assigned to different pipelines.
- Sounds can be of type "Narrator" or "Actor." "Actor" sounds include a character name and gender. All actors and the narrator are mapped and assigned to TTS speakers.
- Parallel Processing: The Scenes and Sounds are run through different parallel pipelines before converging on the Transcript and Video Render pipeline.
Scene Image Generation Stage-
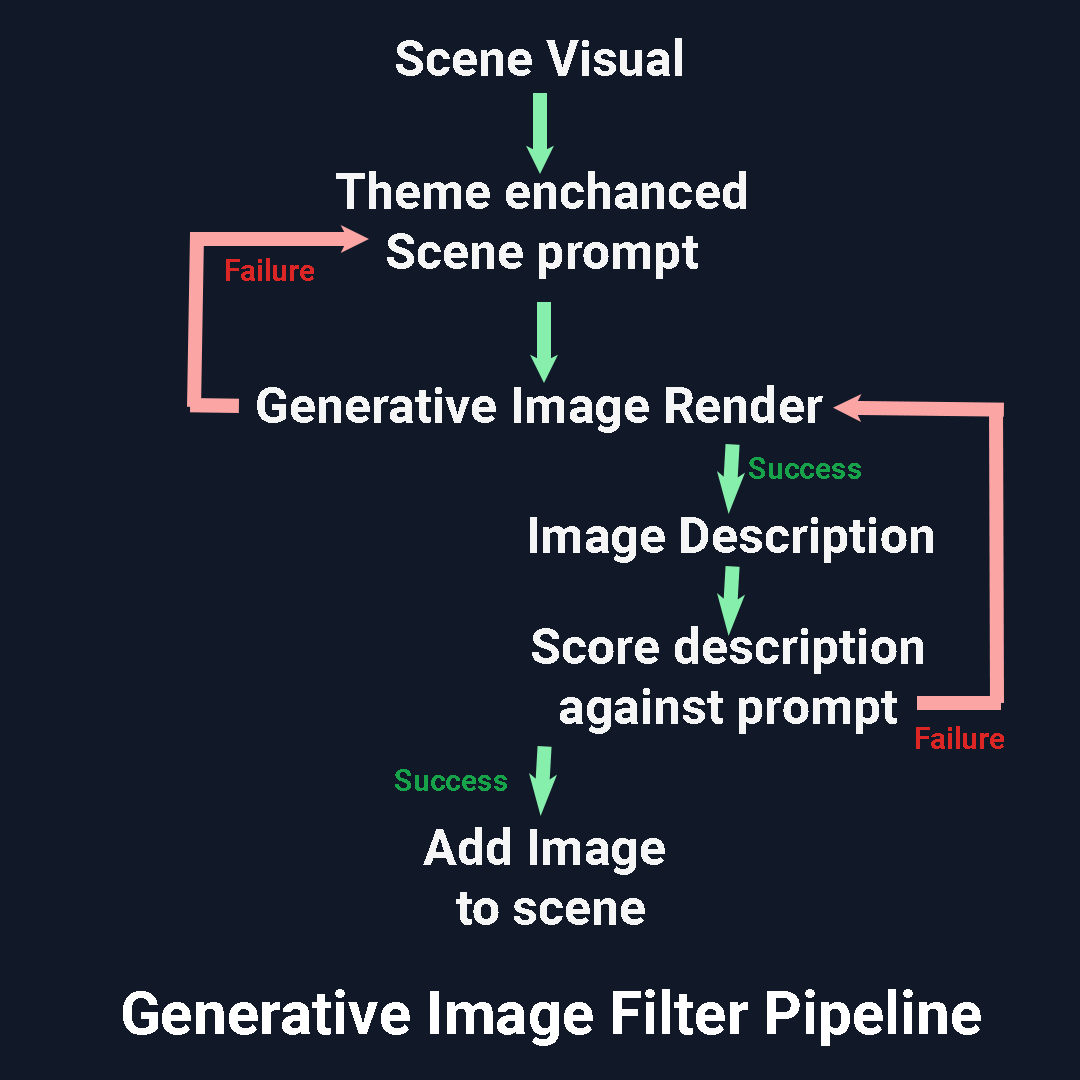
For the image generation pipeline , we take the scene visual and enhance it with the theme to create consistent characters & visuals within the context of the theme.
We further customize the input prompt based on the type of scene-
For narration scenes we don't do any modifications to input visual.
For character scenes, we modify the prompt to focus on the character who is speaking.
For sound effect scenes, we modify the prompt to focus on the action being performed.
On generation failure we modify the prompt, with backoff retry and try again. Each failure we modify the prompt from being more specific to most general.
Once we have a generation, we run it through the image re-filtering pipeline described below. For the image generation stage we choose Flux1.1Pro and Imagen3 because both of them support long prompts, render high quality images, are available via API and have excellent prompt adherence.
Image Re-filtering Stage-
Once a scene image is generated, we run it through an adversarial vision pipeline where we describe the image in details, and then compare the description to the original prompt to assign it a score.
If the image description matches the prompt and character description we mark it as success else mark it as failed and rerun the image through the pipeline, after 3 runs if no success is found, we choose the image from the previous 3 runs with the highest match and continue to the next step.
Audio Generation Stage-
A typical VidGPT project contains three types of sound items:
- Speech: Generated by predefined TTS providers mapped to character types. We then combine the speech with the video in the Video2Video pipeline.
- Sound Effects: Created using Vid2Vid models or external special effects providers.
- Background Music: Can be timestamped or span the entire duration of the movie, with ducking applied when overlaid with speech or sound effects.
A VidGPT movie includes all three types of sounds by default. You can remove layers in Studio during post-processing. The background score covers the entire movie by default, but you can remove it or add different background scores for specific scenes during post-processing.
Video Clip Generation Stage-
The final generation stage is the AI video clip generation stage, which consists of two stages.
Img-to-Vid Stage
The first stage involves generating image-to-video prompts and running them through an image-to-video engine such as RunwayML or Kling Img2Vid. For this implementation, we chose RunwayML and Kling1.6 because both support the following criteria needed for this pipeline to function:
- Available via API
- Image-to-video support
- Support for longer duration (10-second) videos
- Excellent prompt adherence
Once we have the video for all the scenes, for "character" type scenes, we further run them through the Vid-to-Vid pipeline.
Video-to-Video Stage
For character and sound-effect type scenes, we will further run the following pipelines:
- Apply Lipsync PipelineThis pipeline is used for lip-syncing character videos with speech. We use the LatentSync model to generate lipsync for the video. In case of failure, which can occur for various reasons, we use the base AI layer for the scene.
- Apply Sound-Effects PipelineFor the sound effects step, we take the video and the scene prompt and run it through MMAudioV2. After finishing, we'll extract the frames and the audio from the rendered video and add them to our project.
Frame generation stage-
Once we have all the audio and video layers, we can generate the frames, while the audio layers are not strictly needed for frames, we many need to re-adjust the duration of scenes based on audio duration, so always best to have frame render at the end of the pipeline.
For frame generation we simply combine all the layers at a given frame stamp and render a frame image.
Video render stage-
The final step in the processing pipeline is the video render where we combine all the stages and render the mp4 video in the chosen aspect ratio.
We combine the timestamped frames and audio frames to generate the final video at 30 FPS at the desired aspect ratio.
Post-processing stage-
Once you have your one-shot movie render you can download it or post-process individual scenes in the Studio editor.
Post-processing involves removing top layer to get to the layer underneath it.
For example, you can remove the sound effect video layer or the lip synced layer to get to the base img-to-vid layer .
You can then generate the corresponding vid2vid effect again or remove the video layer to get to the frame image layer.
If you delete the img-to-vid layer you can get to the first frame of the generative video which is a derivative of the original generative image frame.
Delete that to get to the original image frame. Regenerate the image frame bottom up or start in any other step of the hierarchy.
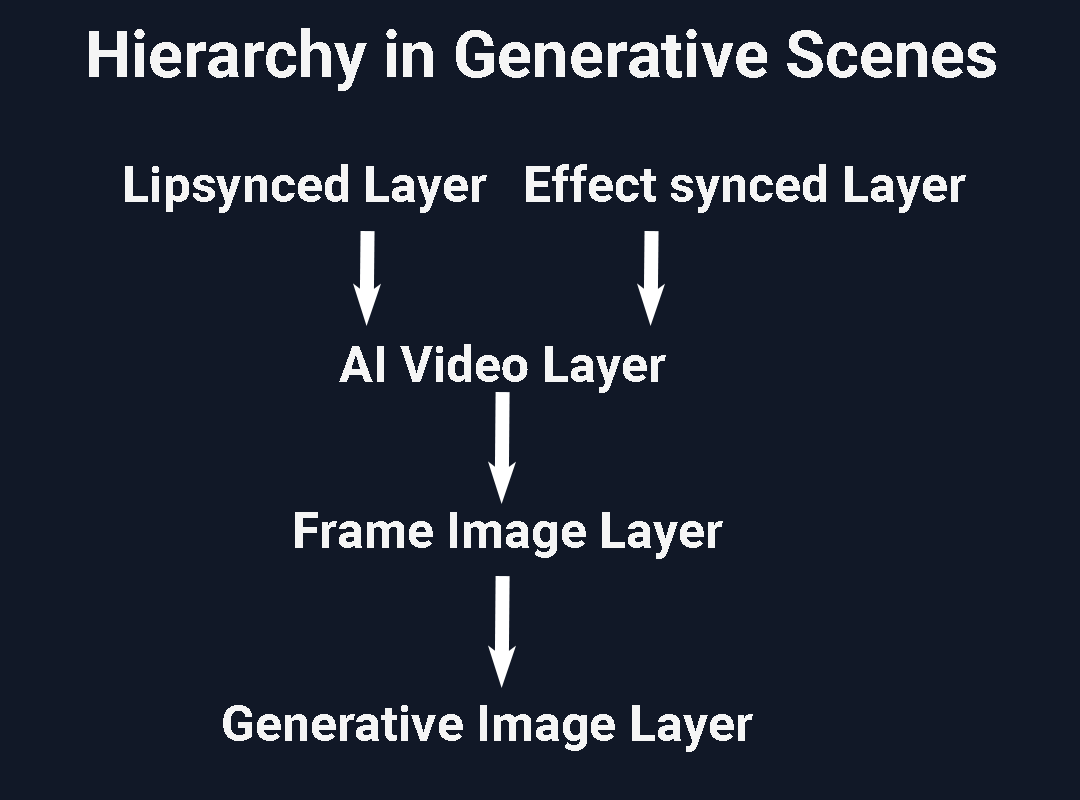
When post-processing you'll typically want to move down depending on the depth of edit that you want to make.. For instance, don't like the lip-sync, delete the lipsync layer to reveal the ai video layer...don't like that either delete that to reveal the starting frame image. Too low quality, delete that to reveal the original generative frame for the scene.
Check out VidGPT (Alpha) at samsar.one/vidgpt. Try creating your own movie or view examples.
Use code VIDGPTONE after signing up to get 50% off your first month of premium membership.
Special thanks to our API providers and partners for making this possible: OpenAI, Microsoft, Fal, Google DeepMind, RunwayML, and others.
Finally, check out some of the latest renders here.
Follow us on X or Threads to keep up with the latest updates.